A Return Point Gives Shared Tools a Place to Go
A return point for shared tools makes borrowing less uncertain: name one visible home, mark it clearly, and help neighbors spot what needs attention.
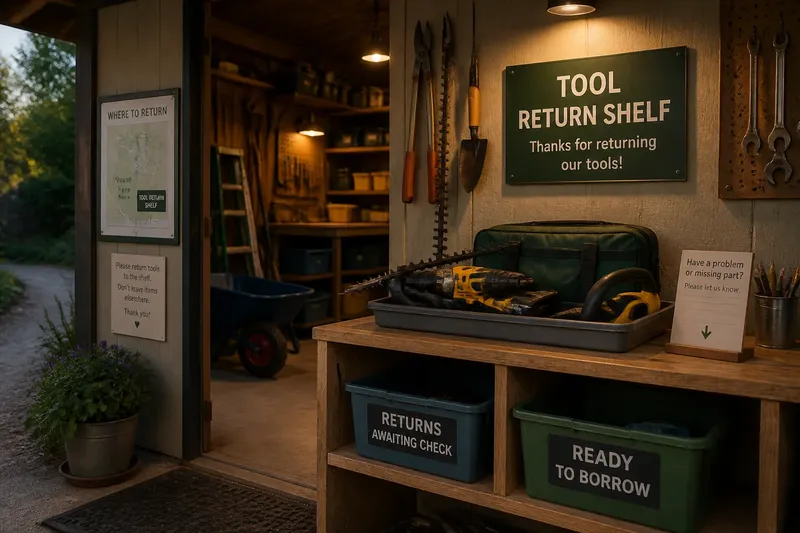
The common mistake with shared tools is to assume “put it back” tells everyone where that means. A cordless drill may end up on a workshop shelf, in a storage bin, or beside the sign-out sheet, leaving the next borrower to search—or to wonder whether it is still out. A visible, consistently named return point turns that guess into a simple, shared expectation.
One place, one name
A return point is the designated location where borrowed items go when they are no longer in use. It might be a labeled shelf, a marked cabinet, a pegboard section, or a sturdy tray near the tool library entrance. Its usefulness comes less from its furniture than from everyone referring to it the same way.
If one neighbor calls the spot “the tool shelf,” another says “the counter,” and a third writes “storage” on a note, the location is technically known but practically fuzzy. Choose a short name and use it on signs, checkout cards, and messages. “Tool return shelf” is less charming than “the place by the thing,” but it leaves less room for interpretation.
A return point does not need to be the tool’s permanent storage location. Keeping returns together can make them easy to notice, while a volunteer later checks condition and moves each item to its proper home. That distinction is useful when tools have cases, chargers, or attachments that need to stay together.
Make it easy to see
People tend to return things where the next action is apparent. Put the return point along the natural path out of the shared workshop or lending area, rather than behind a door or in a cabinet that looks private. A clear label at eye level can do more than a long instruction sheet tucked into a binder.
Give the location enough room for the collection’s ordinary mix of items. A narrow shelf may work for hand pruners and tape measures, but not for a wheelbarrow or a folding ladder. For tools that should not be left loose, identify the correct return container or storage bay as part of the same visible arrangement.
Make the return point distinct from the outgoing pickup area if both exist. Otherwise, someone collecting a reserved item may mistake a fresh return for an item ready to borrow. A simple sign can identify the difference: “Returns awaiting check” and “Ready to borrow” describe separate states, not competing names for one shelf.
Give returns a useful state
A tool placed at the return point is not always ready for the next person. It may be damp, missing a part, or left with a note about a problem. The location should help the group tell the difference between “returned” and “ready,” without requiring a borrower to inspect every item like a detective at a very small crime scene.
For a small collection, a return tray can be enough, with a nearby card for reporting damage or missing pieces. For a larger collection, use separate, clearly marked areas for ordinary returns and items needing attention. Avoid a complicated status system unless someone can keep it current; an outdated label can mislead more than no label at all.
Say a neighborhood group lends a hedge trimmer, its battery, and a protective case. A borrower returns the set to the marked tool return shelf and leaves a note that the battery did not hold its charge during use. The next caretaker can keep the set out of the ready-to-borrow area until someone checks it, rather than passing the problem silently to the next neighbor.
Keep the name consistent
Consistency matters wherever a borrower encounters the return location. Use the same wording on the physical sign, the lending list, and any reminder sent through a group chat. If the shelf moves, update those references together; otherwise, the old name may keep sending people to an empty patch of wall.
A map or photo can help when the collection is in a shared garage, basement, or community shed with several storage zones. Keep it simple: identify the entrance and the return point, not every broom and extension cord. The aim is to remove uncertainty about where to leave an item, not to produce a catalog of the building.
Where tools have specific handling or storage requirements, follow the label and manufacturer instructions. Local rules may also apply to some items, so a group should check those rather than treating the return shelf as a substitute for proper storage.
Who checks the point?
A return location stays useful when someone has a modest, clear responsibility for checking it. That person might be the volunteer who opens the lending area, the caretaker on a regular rota, or whoever manages the collection. The role can be shared, but the group should know how a return becomes a checked, ready item.
Keep the task concrete. A check might mean confirming that obvious accessories are present, moving items with a problem note aside, and putting ready tools in their labeled homes. It need not become a full inspection after every use; the appropriate level depends on the tool and the group’s arrangements.
Make room for a return when nobody is on duty. A labeled bin or shelf can accept items outside staffed hours, while a short note explains how to flag a concern. If the group cannot safely accept a particular item unattended, say so plainly and provide a contact route for arranging its return.
Questions about return points?
Should every shared tool have the same return point?
One shared location is easiest to remember when the collection is modest and the tools can be left together safely. Larger or varied collections may need more than one return zone, but each zone should have a distinct name and a clear sign identifying the items it accepts.
Is the return point also the permanent storage area?
It can be, especially when the group has a small collection and each tool has a labeled place. A separate return area is useful when volunteers need to check items before putting them back into storage or when borrowers arrive outside staffed hours.
What if someone returns a tool with a problem?
Give borrowers an obvious way to flag the issue, such as a note card or a marked tray for items needing attention. Keep the item out of the ready-to-borrow area until the group’s designated caretaker has addressed the report.
How should the group handle a moved return point?
Update the sign and every regular reference at the same time, including lending records and shared messages. If people still use the former location, place a temporary direction there until the new spot becomes familiar.
Let the arrangement adapt
Watch for repeated signs of confusion: tools left beside the return shelf, borrowers asking where the spot is, or ready items mixed with unresolved returns. These are practical signals that the location, label, or handoff needs adjustment. Ask the people who borrow and care for the tools what they find unclear, then change the arrangement rather than adding another paragraph of instructions.
A return point for shared tools works best when its name, location, and purpose agree. Keep the sign visible, make the next state legible, and give someone responsibility for moving returns back into circulation. The shelf can be ordinary; knowing where a borrowed wrench belongs should not require local folklore.